All movies have an initial state. This shows how a movie looks before it runs and anyone interacts with it. Sometimes you must set variables and movie clip properties to establish this first state. For example, in the puzzle.fla file, certain dialog boxes and pattern guides must be hidden in the initial state.
Each movie clip in a Flash movie has a set of qualities, or properties, that you can manipulate with ActionScript. Each of those properties is identified by a name preceded by an underscore (_) character. For example, each movie clip has an _xscale property, a _yscale property, and a _rotation property, among others.
ActionScript uses variables to store information. For example, the variable myName might hold the value "Jody Singer". You can learn more about variables in the section “Save and retrieve information” on page 61.
You initialize properties and variables in the first frame of a movie. You can assign a frame action in the Timeline, or attach an object action to a movie clip. In the puzzle movie, the properties of the pattern guide and dialog box movie clips are initialized in the first frame of the main Timeline.
Open the starting file
Now you’re ready to create your own version of the tutorial movie.
1 Choose File > Open.
2 In the Flash MX application folder, browse to Tutorials/ActionScript/My_Puzzle and open mypuzzle.fla.
3 If you receive a font substitution message, click Use Default.
You see a partially completed tutorial movie. The movie may look finished because all the symbols are in place on the Stage. However, you’ll still need to add quite a few scripts to make the movie interactive.
4 Choose File > Save As and save the file with a new and sequential name, such as mypuzzle2.fla, in the same folder as mypuzzle.fla.
Making a copy of the file allows you or another user to complete the tutorial again using the original mypuzzle.fla file. Additionally, if you regularly save your file with a new and sequential name, you can revert to an earlier file if you make an error that you’re not able to resolve in your current file.
Set movie clip properties
The puzzle.fla movie has three dialog boxes: one alerts you when the puzzle is completed, and the other two ask if you want to scramble the puzzle pieces. Additionally, several patterns and guides overlay the solution area to help users solve the puzzle. Each of these dialog boxes, patterns, and guides is a movie clip.
To initialize the movie, you must hide several of the movie clips so that only the start dialog box and the puzzle pieces are showing. You’ll do this by setting their _visible properties to false.
1 Select Frame 1 in the Actions layer. If the Actions panel isn’t open, choose Window > Actions.
The Actions panel shows actions associated with the selected frame. Text after double slashes (//) is commented text, which offers information helpful in understanding the scripts.
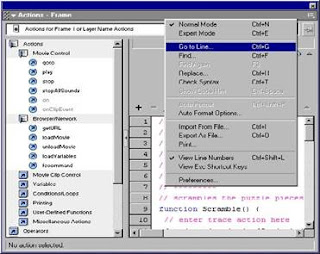
2 Click the pop-up menu in the upper right corner of the Actions panel title bar. Verify that Normal Mode and View Line Numbers are selected.
3 In the Script pane, click line 4 to select the commented code that reads //ENTER code here.
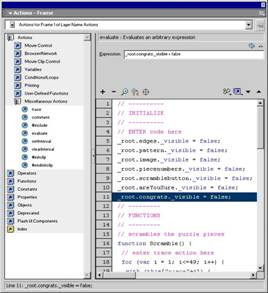
4 From the Actions > Miscellaneous Actions category in the Actions toolbox on the left, double-click the evaluate action to add an empty line of code ending with a semicolon. A semicolon (;) in an ActionScript statement is like a period (.) in an ordinary sentence.
 5 With the insertion point in the Expression text box of the Actions panel, click the Insert Target Path button. The Insert Target Path dialog box appears.
6 Verify that Dots, meaning dots notation, and Absolute, meaning absolute path, are selected. In the dialog box, you see a list of movie clips from which you can select.
7 Select the edges movie clip from the movie clip tree, then click OK. The following code appears in the Expression text box: _root.edges
A target path tells ActionScript the location of a movie clip within the overall structure of a Flash movie. The _root property refers to the main Timeline and the edges movie clip lives on the Stage of the main Timeline. Any target path that begins with _root is called an absolute path because it gives the complete path to a movie clip from the main Timeline.
8 With the insertion point after _root.edges, enter ._visible = false in the Expression text box.
This line of code makes the movie clip invisible on the Stage.
You can type the code manually, or you can choose ActionScript items from the Properties and Operators folders in the Actions toolbox.
If you make an error entering an action and decide you’d like to delete it, select the action in
the Script pane and click the Minus (-) button in the Actions panel.
9 In the Actions toolbox, again double-click the evaluateaction to add an empty line of code ending with a semicolon. Repeat steps 5 and 6, then choose the pattern movie clip in the Insert Target Path dialog box. Repeat Step 8, again typing ._visible = false in the Expression text box.
10 Continue to repeat steps 4 through 8, choosing the image, piecenumbers, scramblebutton, areYouSure, and congrats movie clips in the Insert Target Path dialog box, and typing ._visible = false for each movie clip.When you finish, your script should appear as follows:
11 Choose File > Save As and enter a new filename. Use a consecutive naming scheme, such as mypuzzle3.fla, so you can revert to earlier versions of the file, if necessary.
Use the Reference panel
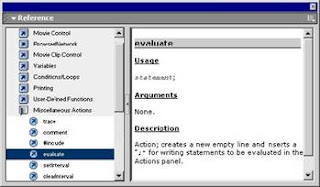
During authoring, if you’d like additional information about the ActionScript that you enter, you can select the action in the Actions toolbox or Script pane, then click the Reference button. The Reference panel, a help system organized similarly to the Actions panel, displays information about the selected action.
Test your syntax
ActionScript, like written language, depends on correct syntax. If the syntax is incorrect, the
action will not execute correctly. Flash offers a variety of ways for you to test your syntax.
1 Click the Options menu in the upper right corner of the Actions panel title bar and choose Check Syntax.
If the syntax is correct, a message appears stating that the script contains no errors.
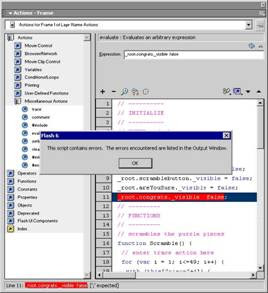
If the syntax is incorrect, a message appears stating the script contains errors; the Output window opens and displays information about the error.
2 Click OK to close the syntax message.
In normal mode, ActionScript syntax errors appear highlighted in red in the Script pane. If you move your mouse pointer over the error, a tooltip displays the error message. Syntax error messages also appear highlighted along the bottom status area of the Actions panel.
Each movie clip in a Flash movie has a set of qualities, or properties, that you can manipulate with ActionScript. Each of those properties is identified by a name preceded by an underscore (_) character. For example, each movie clip has an _xscale property, a _yscale property, and a _rotation property, among others.
ActionScript uses variables to store information. For example, the variable myName might hold the value "Jody Singer". You can learn more about variables in the section “Save and retrieve information” on page 61.
You initialize properties and variables in the first frame of a movie. You can assign a frame action in the Timeline, or attach an object action to a movie clip. In the puzzle movie, the properties of the pattern guide and dialog box movie clips are initialized in the first frame of the main Timeline.
Open the starting file
Now you’re ready to create your own version of the tutorial movie.
1 Choose File > Open.
2 In the Flash MX application folder, browse to Tutorials/ActionScript/My_Puzzle and open mypuzzle.fla.
3 If you receive a font substitution message, click Use Default.
You see a partially completed tutorial movie. The movie may look finished because all the symbols are in place on the Stage. However, you’ll still need to add quite a few scripts to make the movie interactive.
4 Choose File > Save As and save the file with a new and sequential name, such as mypuzzle2.fla, in the same folder as mypuzzle.fla.
Making a copy of the file allows you or another user to complete the tutorial again using the original mypuzzle.fla file. Additionally, if you regularly save your file with a new and sequential name, you can revert to an earlier file if you make an error that you’re not able to resolve in your current file.
Set movie clip properties
The puzzle.fla movie has three dialog boxes: one alerts you when the puzzle is completed, and the other two ask if you want to scramble the puzzle pieces. Additionally, several patterns and guides overlay the solution area to help users solve the puzzle. Each of these dialog boxes, patterns, and guides is a movie clip.
To initialize the movie, you must hide several of the movie clips so that only the start dialog box and the puzzle pieces are showing. You’ll do this by setting their _visible properties to false.
1 Select Frame 1 in the Actions layer. If the Actions panel isn’t open, choose Window > Actions.
The Actions panel shows actions associated with the selected frame. Text after double slashes (//) is commented text, which offers information helpful in understanding the scripts.
2 Click the pop-up menu in the upper right corner of the Actions panel title bar. Verify that Normal Mode and View Line Numbers are selected.

3 In the Script pane, click line 4 to select the commented code that reads //ENTER code here.
4 From the Actions > Miscellaneous Actions category in the Actions toolbox on the left, double-click the evaluate action to add an empty line of code ending with a semicolon. A semicolon (;) in an ActionScript statement is like a period (.) in an ordinary sentence.
 5 With the insertion point in the Expression text box of the Actions panel, click the Insert Target Path button. The Insert Target Path dialog box appears.
6 Verify that Dots, meaning dots notation, and Absolute, meaning absolute path, are selected. In the dialog box, you see a list of movie clips from which you can select.
7 Select the edges movie clip from the movie clip tree, then click OK. The following code appears in the Expression text box: _root.edges
A target path tells ActionScript the location of a movie clip within the overall structure of a Flash movie. The _root property refers to the main Timeline and the edges movie clip lives on the Stage of the main Timeline. Any target path that begins with _root is called an absolute path because it gives the complete path to a movie clip from the main Timeline.
8 With the insertion point after _root.edges, enter ._visible = false in the Expression text box.
This line of code makes the movie clip invisible on the Stage.
You can type the code manually, or you can choose ActionScript items from the Properties and Operators folders in the Actions toolbox.
If you make an error entering an action and decide you’d like to delete it, select the action in
the Script pane and click the Minus (-) button in the Actions panel.
9 In the Actions toolbox, again double-click the evaluateaction to add an empty line of code ending with a semicolon. Repeat steps 5 and 6, then choose the pattern movie clip in the Insert Target Path dialog box. Repeat Step 8, again typing ._visible = false in the Expression text box.
10 Continue to repeat steps 4 through 8, choosing the image, piecenumbers, scramblebutton, areYouSure, and congrats movie clips in the Insert Target Path dialog box, and typing ._visible = false for each movie clip.When you finish, your script should appear as follows:

11 Choose File > Save As and enter a new filename. Use a consecutive naming scheme, such as mypuzzle3.fla, so you can revert to earlier versions of the file, if necessary.
Use the Reference panel
During authoring, if you’d like additional information about the ActionScript that you enter, you can select the action in the Actions toolbox or Script pane, then click the Reference button. The Reference panel, a help system organized similarly to the Actions panel, displays information about the selected action.

Test your syntax
ActionScript, like written language, depends on correct syntax. If the syntax is incorrect, the
action will not execute correctly. Flash offers a variety of ways for you to test your syntax.
1 Click the Options menu in the upper right corner of the Actions panel title bar and choose Check Syntax.
If the syntax is correct, a message appears stating that the script contains no errors.
If the syntax is incorrect, a message appears stating the script contains errors; the Output window opens and displays information about the error.
2 Click OK to close the syntax message.
In normal mode, ActionScript syntax errors appear highlighted in red in the Script pane. If you move your mouse pointer over the error, a tooltip displays the error message. Syntax error messages also appear highlighted along the bottom status area of the Actions panel.

Additionally, as you learned in the Introduction to Flash MX Tutorial, you can choose Control > Test Movie throughout authoring to test if your movie plays as expected.
.
.
==============================================
.
Contents
Trademarks
CHAPTER 1 - Introduction to Flash MX Tutorial
CHAPTER 1 - What you should know
CHAPTER 1 - View the completed movie
CHAPTER 1 - Analyze the stiletto.fla file
CHAPTER 1 - Define properties for a new document and create a ...
CHAPTER 1 - Create and mask vector art
CHAPTER 1 - Tween bitmap effects within a movie cl...
CHAPTER 1 - Load dynamic text at runtime
CHAPTER 1 - Add animation and navigation to button...
CHAPTER 1 - Add streaming and event sounds
CHAPTER 1 - Organize your Library panel
CHAPTER 1 - Test download performance and publish ...
CHAPTER 1 - The next steps
.
CHAPTER 2 - Introduction to ActionScript Tutorial
CHAPTER 2 - View a completed movie
CHAPTER 2 - Initialize the movie
CHAPTER 2 - Save and retrieve information
CHAPTER 2 - Display information in a dynamic text ...
CHAPTER 2 - Write an expression
CHAPTER 2 - Control the flow ofthe movie
CHAPTER 2 - Create commands and reuse code
CHAPTER 2 - Use a built-in object
CHAPTER 2 - Test the movie
CHAPTER 2 - The next steps
.
CHAPTER 3 - Introduction to Components Tutorial
CHAPTER 3 - Types of components
CHAPTER 3 - View the completed form
CHAPTER 3 - Create a form
CHAPTER 3 - The next steps
.
==============================================
.
==============================================
.
Contents
Trademarks
CHAPTER 1 - Introduction to Flash MX Tutorial
CHAPTER 1 - What you should know
CHAPTER 1 - View the completed movie
CHAPTER 1 - Analyze the stiletto.fla file
CHAPTER 1 - Define properties for a new document and create a ...
CHAPTER 1 - Create and mask vector art
CHAPTER 1 - Tween bitmap effects within a movie cl...
CHAPTER 1 - Load dynamic text at runtime
CHAPTER 1 - Add animation and navigation to button...
CHAPTER 1 - Add streaming and event sounds
CHAPTER 1 - Organize your Library panel
CHAPTER 1 - Test download performance and publish ...
CHAPTER 1 - The next steps
.
CHAPTER 2 - Introduction to ActionScript Tutorial
CHAPTER 2 - View a completed movie
CHAPTER 2 - Initialize the movie
CHAPTER 2 - Save and retrieve information
CHAPTER 2 - Display information in a dynamic text ...
CHAPTER 2 - Write an expression
CHAPTER 2 - Control the flow ofthe movie
CHAPTER 2 - Create commands and reuse code
CHAPTER 2 - Use a built-in object
CHAPTER 2 - Test the movie
CHAPTER 2 - The next steps
.
CHAPTER 3 - Introduction to Components Tutorial
CHAPTER 3 - Types of components
CHAPTER 3 - View the completed form
CHAPTER 3 - Create a form
CHAPTER 3 - The next steps
.
==============================================