To complete your document, you will use the Publish command to create a Web-compatible movie with the SWF extension.
If you use the Publish command with the default settings, Flash prepares your file for the Web. Flash will Publish the SWF and create an HTML file with the tags necessary to display the SWF.
Once you define the necessary Publish Settings options, you can repeatedly export to all selected formats at once by simply choosing File > Publish. Flash stores the publish settings you specify with the document, so each movie can have its own settings.
In this section, you’ll learn how to complete the following tasks:
• Use the Bandwidth Profiler to test movie download performance
• Publish your movie in one step
• Review and modify publish settings
• View your movie in a Web browser
To complete this section, you can either continue to work on your mystiletto.fla file, or you can browse to your Flash MX application folder and open Tutorials/FlashIntro/stiletto7.fla. If you do use the stiletto7.fla file, save the file with a new name in your My_Stiletto folder to maintain an unadulterated version of the original file.
Test movie download performance
For a Flash movie to play correctly over the Internet, a frame must download before the movie reaches that frame. If the movie reaches a frame that hasn’t downloaded yet, it pauses until the data arrives. The low bandwidth of Flash files promotes fast downloads.
You can use the Bandwidth Profiler to test your movie and identify where pauses might occur. The Bandwidth Profiler graphically shows how much data is sent from each frame in the movie, according to the selected modem speed.
1 Save your document and choose Control > Test Movie.
2 From the Debug menu, select a modem speed to determine the download rate that Flash will simulate.
You can also choose Customize to enter a download rate.
3 Choose View > Bandwidth Profiler to see the SWF with a download performance chart.
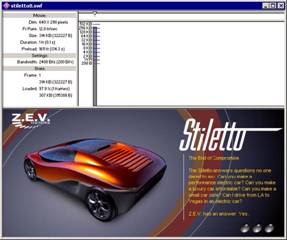
The shaded bar represents the first and only frame in your main movie. Movies with multiple frames will have multiple shaded bars. The height of the bar represents the frame’s size in bytes and kilobytes. Bars that extend above the red line, especially if the bar represents a frame other than the first frame, indicate there could be delays in movie playback. You can optimize your movie for faster downloads. For details, see “Optimizing movies” under Help > Using Flash.
4 When you finish viewing the Bandwidth Profiler, choose View > Bandwidth Profiler to deselect it. Close the SWF window to return to the authoring environment.
Use the Publish command
You can publish your Flash document for Web playback in one step.
• With your document saved, choose File > Publish.
Flash publishes your movie by creating a SWF file, and possibly additional files, based on the attributes in the Publish Settings dialog box. You’ll find the published files, by default, in the same folder where you saved your FLA.
View publish settings
Using the Publish Settings dialog box, it’s easy to reconfigure the way your file publishes.
1 To view your publish settings, choose File > Publish Settings.

Flash is configured, by default, to create a supporting HTML file that displays the Flash movie. When you select a format that requires additional settings, a new tab appears.
2 On the Formats tab, verify that Flash (.swf) and HTML (.html) are selected. Click the Flash tab. By default, the movie publishes for the Flash Player. The publishing process also applies movie and JPEG compression.
3 Click the HTML tab.
By default, the publishing process creates an HTML document that inserts your SWF file in a browser window. Settings on the HTML tab of the Publish Settings dialog box determine how the movie appears in the browser.
Change publish settings
By default, Flash gives the SWF file the same name as the FLA file. You can tell Flash to change the name.
1 On the Formats tab of the Publish Settings dialog box, deselect Use Default Names.
2 In the HTML (.html) text box, select the existing text and type a new name, such as stilettoElectric.html. Then click Publish. When the Publishing status window closes, click OK in the Publish Settings dialog box.
View your published movie in a browser
You can view the HTML file and SWF movie, which you just published, in your browser.
1 Open your browser, then open the HTML file that you created. By default, the HTML file is in the same folder as your FLA file. When you open the HTML file, the SWF movie plays within your browser.
2 In your browser, you can use a command such as View > Page Source or View > Source to view the HTML. OBJECT and EMBED tags ensure that the SWF movie is displayed within the browser.

For additional information about Flash HTML templates, see “About HTML publishing templates” under Help > Using Flash.
.
.
==============================================
.
Contents
Trademarks
CHAPTER 1 - Introduction to Flash MX Tutorial
CHAPTER 1 - What you should know
CHAPTER 1 - View the completed movie
CHAPTER 1 - Analyze the stiletto.fla file
CHAPTER 1 - Define properties for a new document and create a ...
CHAPTER 1 - Create and mask vector art
CHAPTER 1 - Tween bitmap effects within a movie cl...
CHAPTER 1 - Load dynamic text at runtime
CHAPTER 1 - Add animation and navigation to button...
CHAPTER 1 - Add streaming and event sounds
CHAPTER 1 - Organize your Library panel
CHAPTER 1 - Test download performance and publish ...
CHAPTER 1 - The next steps
.
CHAPTER 2 - Introduction to ActionScript Tutorial
CHAPTER 2 - View a completed movie
CHAPTER 2 - Initialize the movie
CHAPTER 2 - Save and retrieve information
CHAPTER 2 - Display information in a dynamic text ...
CHAPTER 2 - Write an expression
CHAPTER 2 - Control the flow ofthe movie
CHAPTER 2 - Create commands and reuse code
CHAPTER 2 - Use a built-in object
CHAPTER 2 - Test the movie
CHAPTER 2 - The next steps
.
CHAPTER 3 - Introduction to Components Tutorial
CHAPTER 3 - Types of components
CHAPTER 3 - View the completed form
CHAPTER 3 - Create a form
CHAPTER 3 - The next steps
.
==============================================
.
==============================================
.
Contents
Trademarks
CHAPTER 1 - Introduction to Flash MX Tutorial
CHAPTER 1 - What you should know
CHAPTER 1 - View the completed movie
CHAPTER 1 - Analyze the stiletto.fla file
CHAPTER 1 - Define properties for a new document and create a ...
CHAPTER 1 - Create and mask vector art
CHAPTER 1 - Tween bitmap effects within a movie cl...
CHAPTER 1 - Load dynamic text at runtime
CHAPTER 1 - Add animation and navigation to button...
CHAPTER 1 - Add streaming and event sounds
CHAPTER 1 - Organize your Library panel
CHAPTER 1 - Test download performance and publish ...
CHAPTER 1 - The next steps
.
CHAPTER 2 - Introduction to ActionScript Tutorial
CHAPTER 2 - View a completed movie
CHAPTER 2 - Initialize the movie
CHAPTER 2 - Save and retrieve information
CHAPTER 2 - Display information in a dynamic text ...
CHAPTER 2 - Write an expression
CHAPTER 2 - Control the flow ofthe movie
CHAPTER 2 - Create commands and reuse code
CHAPTER 2 - Use a built-in object
CHAPTER 2 - Test the movie
CHAPTER 2 - The next steps
.
CHAPTER 3 - Introduction to Components Tutorial
CHAPTER 3 - Types of components
CHAPTER 3 - View the completed form
CHAPTER 3 - Create a form
CHAPTER 3 - The next steps
.
==============================================