When you draw in Flash, you create vector art, which is a mathematical representation of lines, curves, color, and position. Vector art is resolution-independent; you can rescale the art to any size or display it at any resolution without losing clarity. Additionally, vector art downloads faster than comparable bitmap images.
Along with the gradient, the finished file contains background shapes. You’ll use the Oval tool to create the shapes.
Specifically, in this section you’ll learn how to complete the following tasks:
Along with the gradient, the finished file contains background shapes. You’ll use the Oval tool to create the shapes.
Specifically, in this section you’ll learn how to complete the following tasks:
- Addd a layer
- Create and “cut out” shapes
- Mask the layer containing the shapes
To complete this section, you can either continue to work on your mystiletto.fla file, or you can browse to your Flash MX application folder and open Tutorials/FlashIntro/stiletto2.fla. If you do use the stiletto2.fla file, save the file with a new name in your My_Stiletto folder to maintain an unadulterated version of the original file. Add a layer Rather than create the shapes on the Background layer, you’ll add a new layer on which you can draw the shapes.
1 To add a new layer, choose Insert > Layer, or click the Insert Layer button. Name the new layer Shapes.
.
1 To add a new layer, choose Insert > Layer, or click the Insert Layer button. Name the new layer Shapes.
.
Insert Layer button
 2 In the toolbox, select the Oval tool.
3 In the Property inspector, select Hairline from the Stroke Style pop-up menu. Click the Stroke Color control. In the color palette, select the gray with a hexadecimal value of 999999.
Remember, you can either enter the hexadecimal value in the hexadecimal text box, or find and click the color swatch with the same hexadecimal value.
4 If the Color Mixer isn’t open, choose Window > Color Mixer. In the Fill Style pop-up menu, select Solid. Click the Fill Color control to select it. In the R (red) field, type 109. In the G (green) and B (blue) text boxes, type 45, then press Enter or Return. You are specifying the values for the amount of red, green, and blue within a color.
5 In the Timeline, verify that the Shapes layer is selected. On the Stage, constrain the oval to a circle by pressing Shift as you drag, to draw a circle that extends from the canvass area above the Stage to the canvass below the Stage.
Note: If you make a mistake, choose Edit > Undo and try again.
6 Select the Arrow tool in the toolbox, then double-click the circle on the Stage to select both the fill and the stroke.
7 If the Transform panel isn’t open, choose Window > Transform.
8 To expand the Transform panel, click the white arrow in the upper left corner. Select Skew and type 20.0 in the Skew Horizontally text box, then press Enter or Return.

Create and transform a duplicate shape
You’ll now create and transform a duplicate oval.
1 With the oval fill and stroke still selected on the Stage, choose Edit > Duplicate.
2 In the Property inspector, use the Fill Color control to select black.
 3 In the toolbox, select the Free Transform tool. A guide with handles appears around the duplicate oval.
4 Move the pointer over a corner handle until a diagonal indicator with arrows at both ends appears. Drag the corner handle inward to make the oval smaller. Verify that the stroke of the inside oval is not touching the stroke of the outside oval.
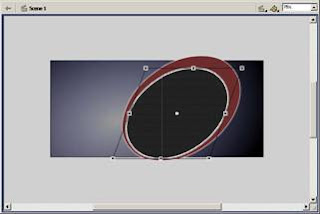
5 Move your pointer above the corner handle until the pointer changes into a circular rotation indicator. Drag the rotation indicator to the left to rotate the oval to the approximate position shown in the following illustration.
Create a “cut out” with the duplicate
When you create one shape on top of another on the same layer, and the two shapes are different colors as well as ungrouped, the shape on top “cuts out” the area of the shape underneath. You’ll delete the duplicate oval to view the cut out effect.
1 With the Free Transform tool guide around the duplicate oval, click anywhere on the Stage or canvass away from the shapes, then click the fill of the inner oval. Press Delete on your keyboard to delete the fill.
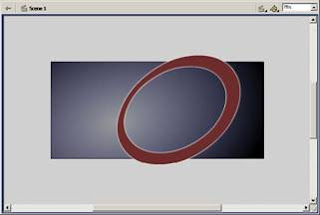
2 The oval now has an outer and an inner stroke. With the Arrow tool, click the outermost stroke on the oval to select it, then Shift-click to select the innermost stroke as well.
Drag the strokes slightly to the right of the fill, as shown in the following illustration.
3 Each area of fill color within the area bisected by the stroke now represents a discrete segment that you can color individually. Select an area of the shape fill, and use the Color Mixer to change the fill color to a brown shade with an R (red) value of 117, a G (green) value of 78, and a B (blue) value of 53. If desired, repeat this step to change another fill area to the lighter shade of brown, as shown in the following illustration:
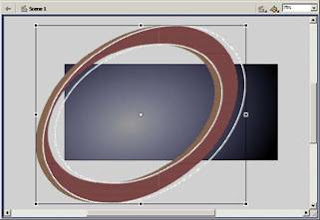
4 Select the Free Transform tool. Drag around the oval background shapes to select all the shapes, then drag the right corner handle of the guide to enlarge the shapes, as shown in the following illustration.
5 Drag the shapes on the Stage so that part of the curve shows on the upper left corner and right side of the Stage.
Note: As you complete the tutorial, remember to save your file frequently.
Create a mask
The art that you created on the Shapes layer extends beyond the Stage, well into the canvass area. Although the area on the canvass won’t appear in your published movie, the art beyond the Stage can be distracting in the authoring environment. While you can erase the part of the shapes that extend into the canvass, a better solution is to apply a mask over the Stage so that only the area under the mask—the entire Stage, in this case—remains visible. This way, if you’d like to return to the shapes to modify them, they will be intact.
1 With the Shapes layer selected, add a new layer to the Timeline and name it Mask.
2 In the toolbox, select the Rectangle tool and draw a rectangle that extends from the upper left corner of the Stage to the lower right corner. This rectangle is the shape of your mask. Anything under the rectangle will be visible.
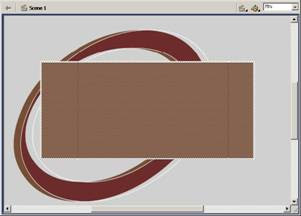
3 Right-click (Windows) or Control-click (Macintosh) the Mask layer name in the Timeline and choose Mask from the context menu.
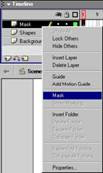
The layer is converted to a mask layer, indicated by a down arrow icon. The layer immediately below it is linked to the mask layer, and its contents show throughout the filled area on the mask. The masked layer name is indented, and its icon changes to a right-pointing arrow. The art on the canvass is no longer visible on the Stage.
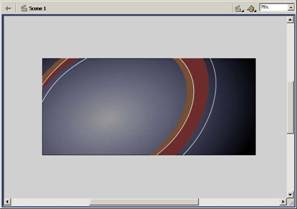
Mask layers must be locked for the Mask effect to show. To edit the shapes, you can unlock the Mask and Background Shapes layers. When you finish editing the art, lock the layers again to invoke masking.
4 Save your file.
.
.
==============================================
.
Contents
Trademarks
CHAPTER 1 - Introduction to Flash MX Tutorial
CHAPTER 1 - What you should know
CHAPTER 1 - View the completed movie
CHAPTER 1 - Analyze the stiletto.fla file
CHAPTER 1 - Define properties for a new document and create a ...
CHAPTER 1 - Create and mask vector art
CHAPTER 1 - Tween bitmap effects within a movie cl...
CHAPTER 1 - Load dynamic text at runtime
CHAPTER 1 - Add animation and navigation to button...
CHAPTER 1 - Add streaming and event sounds
CHAPTER 1 - Organize your Library panel
CHAPTER 1 - Test download performance and publish ...
CHAPTER 1 - The next steps
.
CHAPTER 2 - Introduction to ActionScript Tutorial
CHAPTER 2 - View a completed movie
CHAPTER 2 - Initialize the movie
CHAPTER 2 - Save and retrieve information
CHAPTER 2 - Display information in a dynamic text ...
CHAPTER 2 - Write an expression
CHAPTER 2 - Control the flow ofthe movie
CHAPTER 2 - Create commands and reuse code
CHAPTER 2 - Use a built-in object
CHAPTER 2 - Test the movie
CHAPTER 2 - The next steps
.
CHAPTER 3 - Introduction to Components Tutorial
CHAPTER 3 - Types of components
CHAPTER 3 - View the completed form
CHAPTER 3 - Create a form
CHAPTER 3 - The next steps
.
==============================================
.
==============================================
.
Contents
Trademarks
CHAPTER 1 - Introduction to Flash MX Tutorial
CHAPTER 1 - What you should know
CHAPTER 1 - View the completed movie
CHAPTER 1 - Analyze the stiletto.fla file
CHAPTER 1 - Define properties for a new document and create a ...
CHAPTER 1 - Create and mask vector art
CHAPTER 1 - Tween bitmap effects within a movie cl...
CHAPTER 1 - Load dynamic text at runtime
CHAPTER 1 - Add animation and navigation to button...
CHAPTER 1 - Add streaming and event sounds
CHAPTER 1 - Organize your Library panel
CHAPTER 1 - Test download performance and publish ...
CHAPTER 1 - The next steps
.
CHAPTER 2 - Introduction to ActionScript Tutorial
CHAPTER 2 - View a completed movie
CHAPTER 2 - Initialize the movie
CHAPTER 2 - Save and retrieve information
CHAPTER 2 - Display information in a dynamic text ...
CHAPTER 2 - Write an expression
CHAPTER 2 - Control the flow ofthe movie
CHAPTER 2 - Create commands and reuse code
CHAPTER 2 - Use a built-in object
CHAPTER 2 - Test the movie
CHAPTER 2 - The next steps
.
CHAPTER 3 - Introduction to Components Tutorial
CHAPTER 3 - Types of components
CHAPTER 3 - View the completed form
CHAPTER 3 - Create a form
CHAPTER 3 - The next steps
.
==============================================


