If you’ve added two numbers in a math equation, you’ve used an operator. An operator is a symbol that performs a task, or operation, on a piece, or pieces, of data, or operands. For example, in the expression 2 + 2, the plus sign (+) is the operator and each number is an operand.
An expression is any ActionScript code that can be evaluated to produce a single value. For example, the code myAge + 17 is an expression because when the code runs, ActionScript looks up the value of the myAge variable, adds it to the number 17, and produces a new single value. If the value of myAge is 47, the new value would be 64.
Operators allow you to take the information you collect and store in variables and manipulate it in expressions to create or determine other values. For example, you may know that a user has dropped a puzzle piece onto the solution area, but how do you determine if the piece is in the correct place? And if the piece is in the correct place, how do you determine if the puzzle has been solved? To examine expressions built with arithmetic operators in such a scenario, select Frame 1 of the main Timeline, open the Actions panel, and look at the IsItDone function on line 50.
ActionScript has numeric, or arithmetic, operators, but it also has other types of operators that perform different types of operations. For example, a comparison operator compares values to determine if one operand is greater than, less than, or equal to the other, and a logical operator calculates a true or false value, also called a Boolean value, for an expression.
Now you’ll use an operator called the logical NOT operator to write an expression that shows and hides the puzzle pattern. The logical NOT operator, which is represented by an exclamation mark (!), calculates the opposite Boolean value of its operand. For example, the expression !true yields the value false.
1 If necessary, choose File > Open and choose the version of the mypuzzle.fla file that you last saved.
Note: You can also browse to your Flash MX application folder and open Tutorials/ActionScript/Finished/ puzzle4.fla. If you do use the puzzle4.fla file, save the file with a new name in your My_Puzzle folder to maintain an unadulterated version of the original file.
2 Click the Show/Hide Pattern edges button on the Stage. If the Actions panel isn’t open, choose Window > Actions.
The Actions panel shows actions associated with the button.
3 Select the following line of code in the Script pane:
// ENTER code here
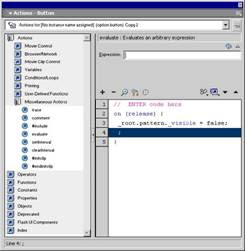
4 In the Actions toolbox, choose Actions > Miscellaneous Actions and drag the evaluate action to the Script pane.
When you add the action, it is enclosed in code called an event handler. The code looks like this:
on (release) { ; }
5 In the Actions toolbox, double-click the evaluate action to add another empty line of code.
The code now looks like this:
on (release) { ; ;
}
6 Select the first empty line—the line with the first semicolon—and place the insertion point in the Expression text box.
You’ll now enter code that hides the pattern movie clip; a user should see either the pattern movie clip or the edges movie clip, but not both.
7 Enter _root.pattern._visible = false in the Expression text box.
You can type the path directly in the Expression text box or use the Insert Target Path dialog box to select the pattern movie clip. If you use the Insert Target Path dialog box, select Dots and Absolute.
Note: As you enter parameters and properties in normal mode, you might notice code hints—tooltips that appear suggesting the complete syntax for an action; you can click a code hint to enter the syntax. For more information about code hints, include enabling and disabling them, see “Using code hints” under Help > Using Flash.
8 Select the second empty line and place the insertion point in the Expression text box.
An expression is any ActionScript code that can be evaluated to produce a single value. For example, the code myAge + 17 is an expression because when the code runs, ActionScript looks up the value of the myAge variable, adds it to the number 17, and produces a new single value. If the value of myAge is 47, the new value would be 64.
Operators allow you to take the information you collect and store in variables and manipulate it in expressions to create or determine other values. For example, you may know that a user has dropped a puzzle piece onto the solution area, but how do you determine if the piece is in the correct place? And if the piece is in the correct place, how do you determine if the puzzle has been solved? To examine expressions built with arithmetic operators in such a scenario, select Frame 1 of the main Timeline, open the Actions panel, and look at the IsItDone function on line 50.
ActionScript has numeric, or arithmetic, operators, but it also has other types of operators that perform different types of operations. For example, a comparison operator compares values to determine if one operand is greater than, less than, or equal to the other, and a logical operator calculates a true or false value, also called a Boolean value, for an expression.
Now you’ll use an operator called the logical NOT operator to write an expression that shows and hides the puzzle pattern. The logical NOT operator, which is represented by an exclamation mark (!), calculates the opposite Boolean value of its operand. For example, the expression !true yields the value false.
1 If necessary, choose File > Open and choose the version of the mypuzzle.fla file that you last saved.
Note: You can also browse to your Flash MX application folder and open Tutorials/ActionScript/Finished/ puzzle4.fla. If you do use the puzzle4.fla file, save the file with a new name in your My_Puzzle folder to maintain an unadulterated version of the original file.
2 Click the Show/Hide Pattern edges button on the Stage. If the Actions panel isn’t open, choose Window > Actions.
The Actions panel shows actions associated with the button.
3 Select the following line of code in the Script pane:
// ENTER code here
4 In the Actions toolbox, choose Actions > Miscellaneous Actions and drag the evaluate action to the Script pane.
When you add the action, it is enclosed in code called an event handler. The code looks like this:
on (release) { ; }
5 In the Actions toolbox, double-click the evaluate action to add another empty line of code.
The code now looks like this:
on (release) { ; ;
}
6 Select the first empty line—the line with the first semicolon—and place the insertion point in the Expression text box.
You’ll now enter code that hides the pattern movie clip; a user should see either the pattern movie clip or the edges movie clip, but not both.
7 Enter _root.pattern._visible = false in the Expression text box.
You can type the path directly in the Expression text box or use the Insert Target Path dialog box to select the pattern movie clip. If you use the Insert Target Path dialog box, select Dots and Absolute.
Note: As you enter parameters and properties in normal mode, you might notice code hints—tooltips that appear suggesting the complete syntax for an action; you can click a code hint to enter the syntax. For more information about code hints, include enabling and disabling them, see “Using code hints” under Help > Using Flash.
8 Select the second empty line and place the insertion point in the Expression text box.

9 Type _root.edges._visible = ! in the Expression text box.
Ignore the syntax error message that appears.
The exclamation mark (!) is a logical NOT operator. In addition to simply typing it in the Expressions text box, you can add it to the text box from the Actions toolbox by choosing Operators > Logical Operators and double-clicking the exclamation mark.
10 Enter _root.edges._visible again in the Expression text box after the operator.
Your code should look like this:
on (release){ _root.pattern._visible = false; _root.edges._visible = !_root.edges._visible;
}
The first line of code inside the event handler sets the visibility of the pattern movie clip to false. The second line of code sets the visibility of the edges movie clip to the opposite of what it currently is. This creates a toggle that either shows or hides the movie clip.
11 Choose File > Save As and enter a new filename. Use a consecutive naming scheme so you can revert to earlier versions of the file, if necessary.
.
.
==============================================
.
Contents
Trademarks
CHAPTER 1 - Introduction to Flash MX Tutorial
CHAPTER 1 - What you should know
CHAPTER 1 - View the completed movie
CHAPTER 1 - Analyze the stiletto.fla file
CHAPTER 1 - Define properties for a new document and create a ...
CHAPTER 1 - Create and mask vector art
CHAPTER 1 - Tween bitmap effects within a movie cl...
CHAPTER 1 - Load dynamic text at runtime
CHAPTER 1 - Add animation and navigation to button...
CHAPTER 1 - Add streaming and event sounds
CHAPTER 1 - Organize your Library panel
CHAPTER 1 - Test download performance and publish ...
CHAPTER 1 - The next steps
.
CHAPTER 2 - Introduction to ActionScript Tutorial
CHAPTER 2 - View a completed movie
CHAPTER 2 - Initialize the movie
CHAPTER 2 - Save and retrieve information
CHAPTER 2 - Display information in a dynamic text ...
CHAPTER 2 - Write an expression
CHAPTER 2 - Control the flow ofthe movie
CHAPTER 2 - Create commands and reuse code
CHAPTER 2 - Use a built-in object
CHAPTER 2 - Test the movie
CHAPTER 2 - The next steps
.
CHAPTER 3 - Introduction to Components Tutorial
CHAPTER 3 - Types of components
CHAPTER 3 - View the completed form
CHAPTER 3 - Create a form
CHAPTER 3 - The next steps
.
==============================================
.
==============================================
.
Contents
Trademarks
CHAPTER 1 - Introduction to Flash MX Tutorial
CHAPTER 1 - What you should know
CHAPTER 1 - View the completed movie
CHAPTER 1 - Analyze the stiletto.fla file
CHAPTER 1 - Define properties for a new document and create a ...
CHAPTER 1 - Create and mask vector art
CHAPTER 1 - Tween bitmap effects within a movie cl...
CHAPTER 1 - Load dynamic text at runtime
CHAPTER 1 - Add animation and navigation to button...
CHAPTER 1 - Add streaming and event sounds
CHAPTER 1 - Organize your Library panel
CHAPTER 1 - Test download performance and publish ...
CHAPTER 1 - The next steps
.
CHAPTER 2 - Introduction to ActionScript Tutorial
CHAPTER 2 - View a completed movie
CHAPTER 2 - Initialize the movie
CHAPTER 2 - Save and retrieve information
CHAPTER 2 - Display information in a dynamic text ...
CHAPTER 2 - Write an expression
CHAPTER 2 - Control the flow ofthe movie
CHAPTER 2 - Create commands and reuse code
CHAPTER 2 - Use a built-in object
CHAPTER 2 - Test the movie
CHAPTER 2 - The next steps
.
CHAPTER 3 - Introduction to Components Tutorial
CHAPTER 3 - Types of components
CHAPTER 3 - View the completed form
CHAPTER 3 - Create a form
CHAPTER 3 - The next steps
.
==============================================